Week 5 - Week 7 (Assignment 2) - Decisive Moment - Art Deco
ILLUSTRATION AND VISUAL NARRATIVE - Assignment 2 (Decisive Moment)
26 September, 2017 - 10 October, 2017 (Week 5 - Week 7)
Jesslyn Fabryando (0332213)
Illustrative and Visual Narrative
Lecture/ Tutorial/ Practical - Week 5 - Session 1 (28 September, 2017): Urban Legend (Narrative structure, Story, research, Research and Mood boards)
On our fifth week, We were asked to find an article or a story that discuss Urban Legend. It can be local or international. Example:
https://coconuts.co/kl/features/creepiest-malaysian-urban-legends-part-one/
Our task is to develop an animated (limited) illustration for an editorial to represent the chosen text. We are to interpret the narratives decisive moment or the climax of the narrative.
The Outcome:
WORK PROCESS:
On that day itself when we found the article, we proceed making the mind map wherein we gather all the ideas what we are going to sketch. It is a good thing to start designing something by making a mind map.
As the class ended, we were asked to find some references (mood boards) at home and posted it up in google plus. At first when I posted my first reference, it's more on a realistic reference not an Art Deco reference. As a result, I tried to find an Art Deco references which I got down below. (Figure 3)
Tutorial - Week 5 - Session 2 (3 October, 2017): Urban Legend (Sketches, Storyboards)
I chose the part of the story wherein the girl name Jane was on her death bed and Johnny, her husband, asked Jane one final time about the ribbon she wore around her neck. Finally, Jane allowed Johnny to untie the ribbon and Jane's head fell off.
On our fifth week, We were asked to find an article or a story that discuss Urban Legend. It can be local or international. Example:
https://coconuts.co/kl/features/creepiest-malaysian-urban-legends-part-one/
Our task is to develop an animated (limited) illustration for an editorial to represent the chosen text. We are to interpret the narratives decisive moment or the climax of the narrative.
The Outcome:
- Interpret a passage of text (story); illustrate the decisive moment (climax).
- The end product must be animated (limited animation).
- You Must use Adobe Illustrator to create the assets and you may animate it in Adobe Photoshop.
- The outcome must be portrait.
3 October, 2017 (Week 5)
Jesslyn Fabryando (0332213)
Illustrative and Visual Narrative
Exercises
Lecture/ Tutorial 3 - Week 5 (3 October, 2017) - Art Deco (Adobe Illustrator)
On our fifth week, We were introduced how to create an Art Deco using Adobe Illustrator software where we were asked to trace a person (Figure 1). and fill in colors.
 |
| Fig. 1. Tracing the person on the right using pen tool |
 |
| Fig. 1.1. The outcome of the tracing and being colored |
WORK PROCESS:
My Urban Legend titled 'Yellow Ribbon'.
I began my assignment by searching an article or a story that discuss Urban legend. I found 'Yellow Ribbon' as my article which has a decisive moment. The flow of the story also have the beginning, middle and the end which I find it easy for me to illustrate later on.  |
| Fig. 2. Story Research |
On that day itself when we found the article, we proceed making the mind map wherein we gather all the ideas what we are going to sketch. It is a good thing to start designing something by making a mind map.
 |
| Fig. 2.1. Mind maps of the Urban Legend (Yellow Ribbon) |
As the class ended, we were asked to find some references (mood boards) at home and posted it up in google plus. At first when I posted my first reference, it's more on a realistic reference not an Art Deco reference. As a result, I tried to find an Art Deco references which I got down below. (Figure 3)
 |
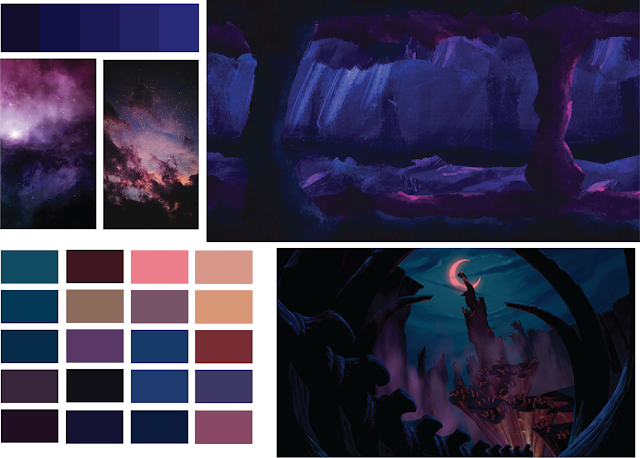
| Fig. 3. Research and Mood boards (Art Deco) |
As I tried to do my first trial, I look again for some references to give me more ideas and to understand more the concept of an Art Deco.  |
| Fig. 3.1. Research and Mood boards (Art Deco) |
Tutorial - Week 5 - Session 2 (3 October, 2017): Urban Legend (Sketches, Storyboards)
I chose the part of the story wherein the girl name Jane was on her death bed and Johnny, her husband, asked Jane one final time about the ribbon she wore around her neck. Finally, Jane allowed Johnny to untie the ribbon and Jane's head fell off.
 |
| Fig. 4. Sketches wherein Jane's head fell off. |
During the class, Mr Hafiz mentioned that it will be good if we have our own texture for our Art Deco. I then proceed making my own texture. For the texture that I did, I use pencil placing the paper on top of the wall and some leftover erasers and I began to color it.
Practical - Week 6 - Session 3 (5 October, 2017): Urban Legend (Sketching and illustrating)
In this week 6, I tried to redo my work and my sketches wherein I need to have the foreground, mid ground, background as well as applying the rule of third. I also need to have composition.
When I showed the three outcome, My feedback was it shouldn't look like a comic. I should make it in that particular moment. Aside from that, I shouldn't be too literal or explicit in the gore.
Lecture/ Practical/ Tutorial - Week 7 (10 October, 2017 - ): Urban Legend (The outcome and the Animated one done in Photoshop)
I made another research for my references in order for me to get to know better what is Art Deco. I seems to be having a hard time making the illustrations. Therefore, doing more research might be a help for me to improve.
From my research, I learnt some combination of colors, and how the position of the lighting create shadows. As I am doing my illustration, I need to make sure I have the right composition and using the rule of third.
For the texture that I made on my own, I used it and placed it as my drawer's texture. I made some adjustment to the opacity as well as the blending mode where I set it to multiply.
As we completed out illustration, Mr. Hafiz mentioned that every Art Deco should at least be animated. Our project requires us to animate our Art Deco. Below is the animated GIF.
FURTHER REFERENCES:
Grain effect
https://design.tutsplus.com/tutorials/create-a-vintage-art-deco-poster-with-illustrators-grain-effect--vector-4179
https://www.itsnicethat.com/articles/rebecca-mock
https://www.buzzfeed.com/kevintang/20-insanely-talented-gif-illustrators-you-should-follow?utm_term=.ymavqYX9ga#.pxx6Y2GRV8
 |
| Fig. 5. Texture of the wall in Taylor's university and texture of leftover erasers |
Practical - Week 6 - Session 3 (5 October, 2017): Urban Legend (Sketching and illustrating)
In this week 6, I tried to redo my work and my sketches wherein I need to have the foreground, mid ground, background as well as applying the rule of third. I also need to have composition.
 |
| Fig. 6. Redo the sketches and some traces in Adobe Illustrator |
Lecture/ Practical/ Tutorial - Week 7 (10 October, 2017 - ): Urban Legend (The outcome and the Animated one done in Photoshop)
 |
| Fig. 7. Sketches from different angle |
 |
| Fig. 8. Research and Mood boards (Art Deco) |
 |
| Fig. 9. Using the rule of third |
 |
| Fig. 10. Adding some texture to the drawers and adjust the opacity and blending mode |
 |
| Fig. 11. Did some gradient color and some gradient texture https://design.tutsplus.com/tutorials/create-a-vintage-art-deco-poster-with-illustrators-grain-effect--vector-4179 |
 |
| Fig. 12. Final outcome |
 |
| Fig. 13. Animated GIF |
FURTHER REFERENCES:
Grain effect
https://design.tutsplus.com/tutorials/create-a-vintage-art-deco-poster-with-illustrators-grain-effect--vector-4179
Websites of Art Deco
http://strautniekas.com
http://www.eirianchapman.com/Teeth-Hair-comb-prints
https://www.behance.net/gallery/47787413/Disney-Art-Dco-series-III
http://strautniekas.com
http://www.eirianchapman.com/Teeth-Hair-comb-prints
https://www.behance.net/gallery/47787413/Disney-Art-Dco-series-III
Websites of animated Art Deco
http://stephenvuillemin.comhttps://www.itsnicethat.com/articles/rebecca-mock
https://www.buzzfeed.com/kevintang/20-insanely-talented-gif-illustrators-you-should-follow?utm_term=.ymavqYX9ga#.pxx6Y2GRV8

Comments
Post a Comment